高层次芯片设计之SystemC Bluecpec
整理了高层次芯片设计课程SystemC Bluecpec部分的知识要点
SystemC#
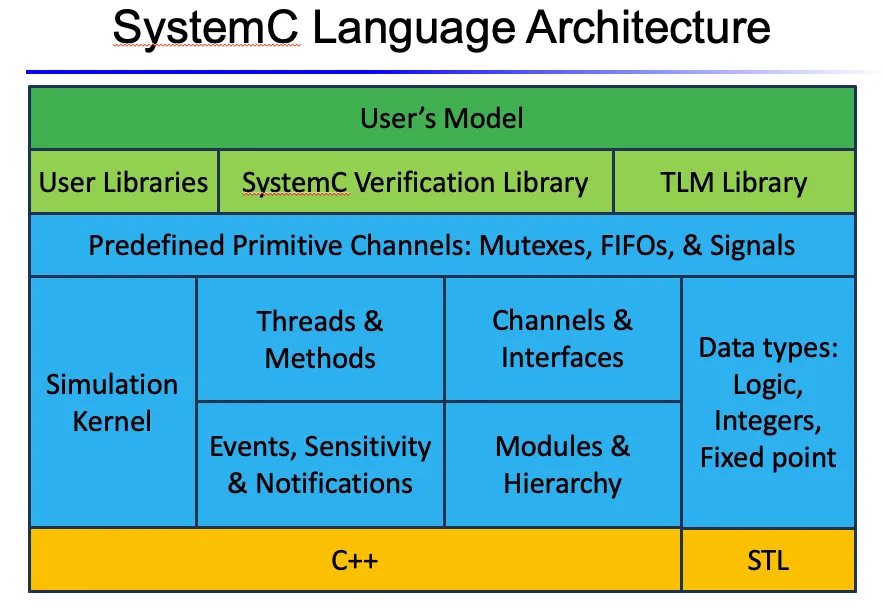
basic#
- thread
SC_MODULE(Adder) {
  sc_in<int> x, y;
  sc_out<int> s;
  void add();
  SC_CTOR(Adder) { //构造函数
    SC_THREAD(add);
    sensitive << x << y;//一旦xy变化唤醒sc_thread中的函数
  }
  void add() {
    for(;;) {
      wait();//若改函数被唤醒,则执行wait之后的语句,否则停留在wait中
      s = x + y;
    }
  }
};- method
SC_MODULE(Adder) {
  sc_in<int> x, y;
  sc_out<int> s;
  void add();
  SC_CTOR(Adder) { //构造函数
    SC_METHOD(add);
    sensitive << x << y; //一旦xy变化调用sc_method中的函数
  }
  void add() {
    s = x + y;
  }
};- 数据类型
sc_logic a, b;//a b可以为0 1 x z
sc_bv<N>; //N bool vector 0100010
sc_lv<N>; //N logic vector 01xxz01
sc_int<N>;sc_bigint<N>;sc_unit<N>;sc_fixed<wl,iwl,qm,om,nb>;//unit无符号
sc_lv //literal
//time
sc_time <name>(<magnitude>, <unit>);
sc_time delay(10, SC_NS): 10ns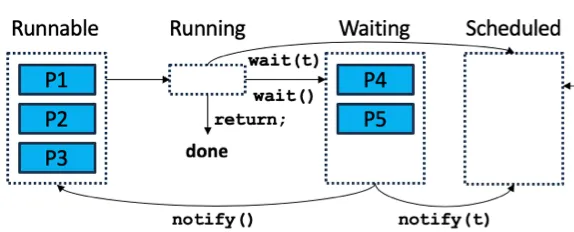
SC_ZERO_TIME: 0- event
int x;
int y;
sc_event new_stim;
void Testbench::stim()
{
  x = 3; y = 4;
  new_stim.notify();//唤醒
  //所有wait(new_stim)
  x = 7; y = 0;
  new_stim.notify();
  // stim 7, 0 again
  new_stim.notify();
  ...
}
new_stim.notify(SC_ZERO_TIME);
new_stim.notify(t);//等待t之后唤醒
new_stim.notify(10,SC_NS);//void Testbench::check()
{
for(;;)
{
wait(new_stim);
if( s == x+y )
cout << “OK\n“;
else
cout << “ERROR\n“;
}
}
wait(SC_ZERO_TIME);
wait(t);
wait(t, a & b);
仿真流程#
1.Elaboration
2.Initialization 维护两个队列:执行队列,等待队列
3.Simulation
4.重新解释notify(SC_ZERO_TIME)
5.重新解释wait(SC_ZERO_TIME)
进程让出控制权、触发事件、更新信号值、进行 delta-cycle 的刷新
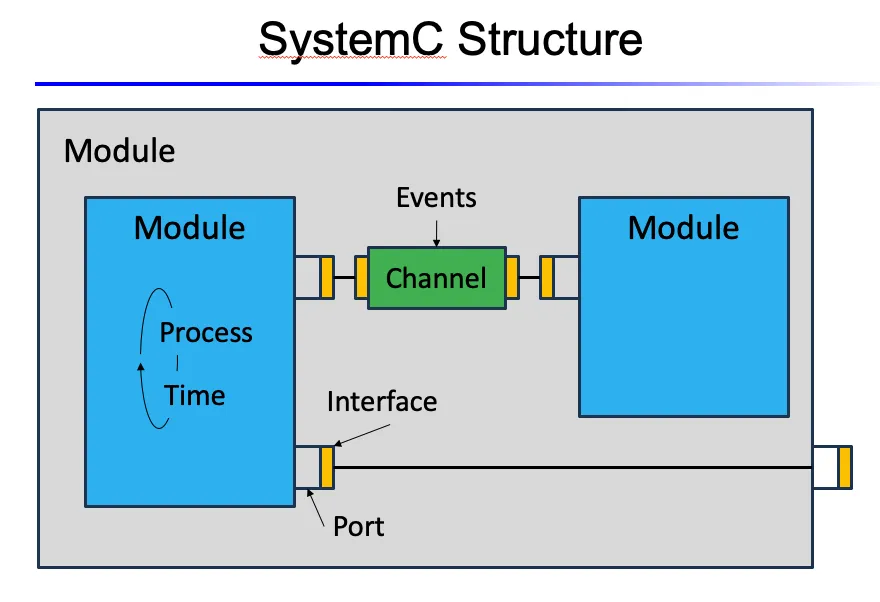
channel & interface#
- interface是抽象类有一些虚函数 不能直接示例化
struct simple_bus_if : sc_interface {
    virtual int read(int addr) = 0;
    virtual void write(int addr, int data) = 0;
};
SC_MODULE(SimpleBus) : simple_bus_if {//自己写的一个channel,典型的hierarchical channel
    int mem[256];

    int read(int addr) override {
        return mem[addr];
    }

    void write(int addr, int data) override {
        mem[addr] = data;
    }
};
SC_MODULE(CPU) {//module写一个port插到channel上
    sc_port<simple_bus_if> bus;

    void run() {
        int x = bus->read(0x10);
        bus->write(0x20, x+1);
    }

    SC_CTOR(CPU) {
        SC_THREAD(run);
    }
};
2.mutex
3.semaphore
4.sc_fifo
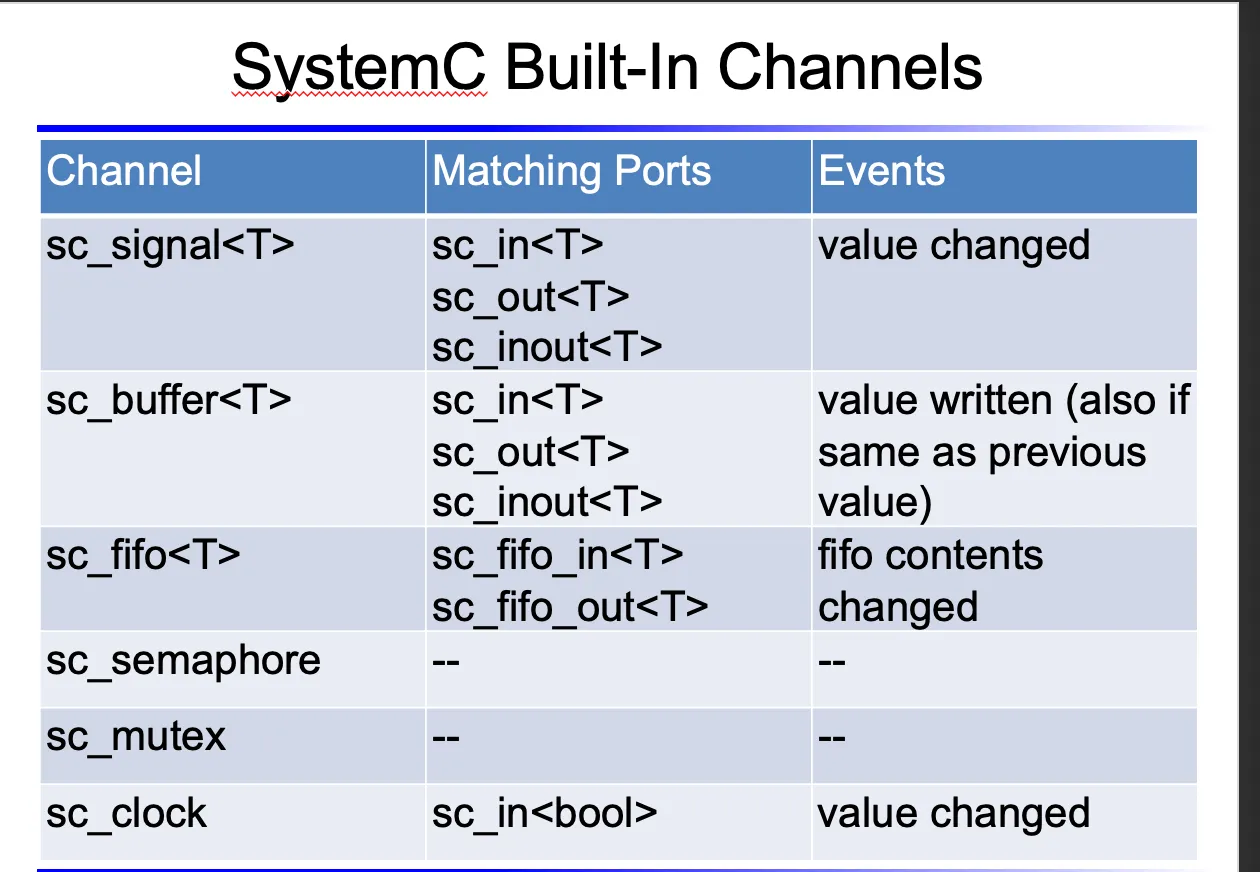
5.sc_signal
delta cycle & New-current
sc_signal<int> count_sig;
sc_signal<string> message_sig;

// 1st delta cycle
count_sig.write(10);
message_sig.write("Hello");
count = 11;
message_temp = "Whoa";
// Outputs
wait(SC_ZERO_TIME);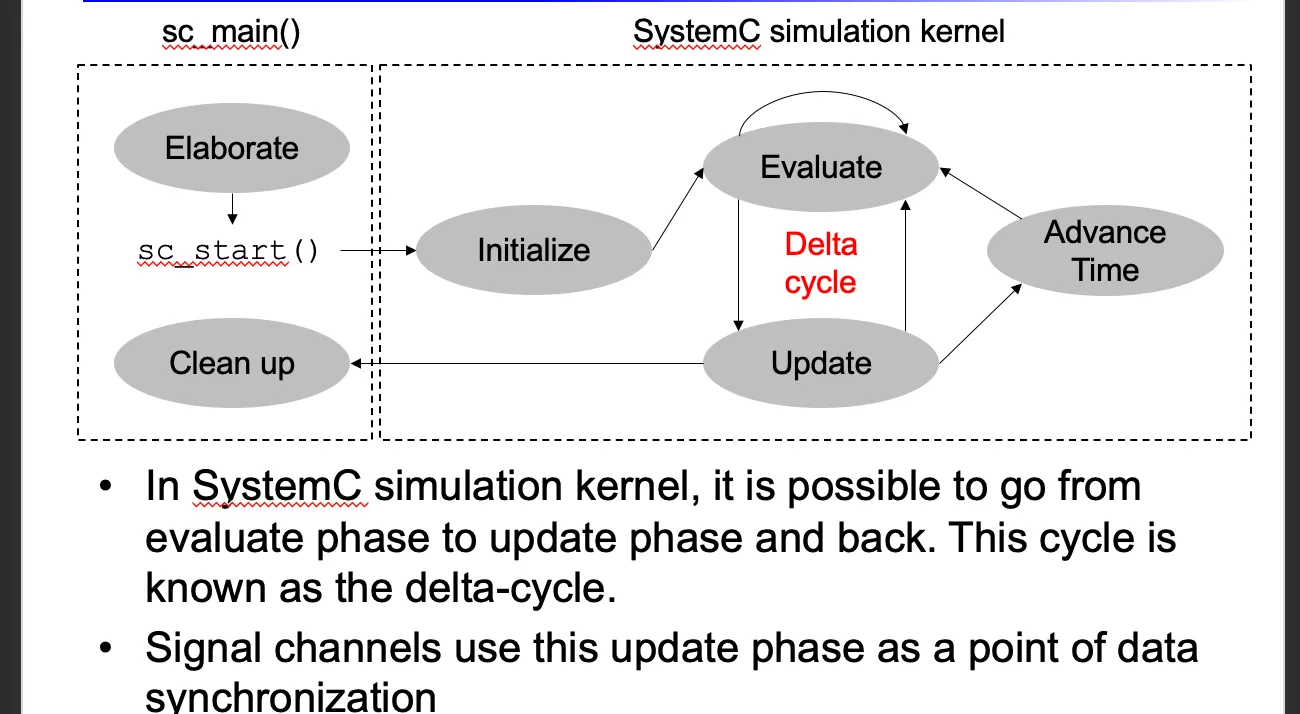
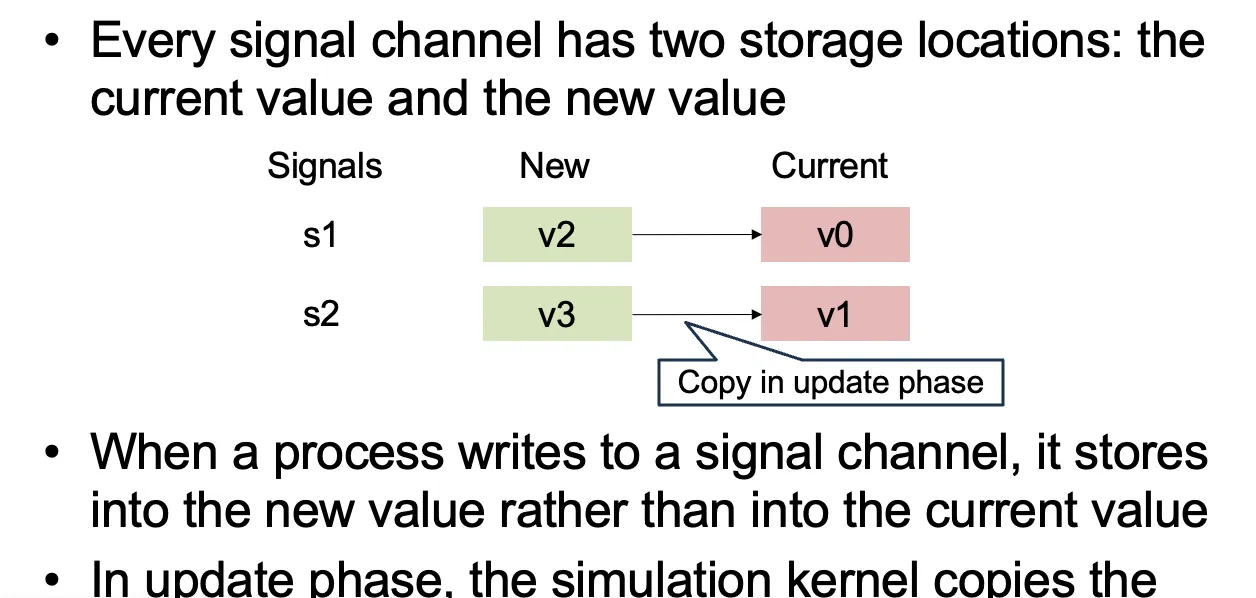
sc_signal写的时候是写到new里面,读的时候读的是current里面,只有更新delta cycle才会将new复制到current里面
6.sc_clock
–sc_clock name(“name”, period, duty_cycle=0.5, start_time=0, posedge_first=true);
–e.g.: sc_clock clk(“clk”, sc_time(10, SC_NS), 0.5, 0, true);
- Clocked thread: SC_CTHREAD(name, clk.pos/neg());
–wait(): wait the next cycle
–wait(N): delay N cycles
7.自定义
可以写一个类+虚函数自己定义 但是示例化的时候需要把虚函数实现
class write_if :
	virtual public sc_interface
{
public:
	virtual void write(char) = 0;
	virtual void reset() = 0;
};

class read_if :
	virtual public sc_interface
{
public:
	virtual void read(char &) = 0;
	virtual int num_available() = 0;
};

class fifo:
	public sc_channel, public write_if, public read_if
{
public:
	// Construction function

	// Implementation of write in write_if
	void write(char c) {
		if (num_elements == max)
			wait(read_event);

		data[(first + num_elements++) % max] = c;
		write_event.notify();
}
	// Implementation of read in read_if
	void read(char &c){
		if (num_elements == 0)
			wait(write_event);

		c = data[first]; --num_elements;
		first = (first + 1) % max;
		read_event.notify();
	}

	void reset() { num_elements = first = 0; }
	int num_available() { return num_elements; }

private:
	enum e { max = 10 };
	char data[max];
	int num_elements, first;
	sc_event write_event, read_event;
};
Port#
SC_MODULE(M1) {
  sc_port<sc_fifo_out_if<int>> p1, p2, p3;
  void write();
};
SC_MODULE(M2) {
  sc_port<sc_fifo_in_if<int>> p2, p3, p1;
  void read();
};
SC_MODULE(Top) {
  M1 m1; M2 m2;
  sc_fifo<int> ch1, ch2, ch3;
  SC_CTOR(Top) : m1(“m1”), m2(“m2”) {
    // Connection by name
    m1.p1(ch1); m2.p1(ch1);
    m1.p2(ch2); m2.p2(ch2);
    m1.p3(ch3); m2.p3(ch3);
  }
};SC_MODULE(Top) {
…
SC_CTOR(Top) : m1(“m1”), m2(“m2”) {
// Connection by position
m1(ch1, ch2, ch3); // p1, p2, p3
m2(ch2, ch3, ch1); // p2, p3, p1
}
};
// port access
void M1::write() {
p1->write(1);
p2->write(2);
p3->write(3);
}
void M2::read() {
int p1_val = p1->read();
int p23_sum = p2->read() + p3->read();
}Bluespec Systemverilog#
组合电路#
Type#
- 所有表达必须都有一个类
//type system
Bit#(n) // n-bit wide bit-vector
Bool // 1-bit value (True or False)
Int#(n) // n-bit signed integer
Reg#(Bit#(n)) // n-bit wide register
Vector#(16, Bit#(8)) // Vector of size 16
FIFO#(Int#(32)) // FIFO containing Int#(32)’s这些类都是继承自已有的库的,也可以类型派生
typedef struct {
	Int#(t) r;
	Int#(t) i;
} Complex#(numeric type t) deriving (Bits, Eq);

Complex#(16) c1 = Complex#(16){r: 3, i: 4};
Complex#(16) C2 = Complex#(16){r: 4, i: 5};
c1 == c2;

Bit#(32) bits = pack(c1);- 运算符重载
instance Arith#(Complex#(t));
// Overloading +
function Complex#(t) \+ (Complex#(t) x, Complex#(t) y);
Int#(t) real = x.r + y.r;
Int#(t) imag = x.i + y.i;
return (Complexr: real, i: imag});
endfunction
// Other arithmetic operations
endinstance- 用let让编译器自动计算数据类
function Bit#(2) fa(
Bit#(1) a, Bit#(1) b,
Bit#(1) c_in
) ;
let t = a ^ b;
let s= t ^ c_in;
let c_out = (a &b) | (c_in & t);
return {c_out, s};
endfunctionParameterization#
Bit#(2)可以写成类似于Bit#(n) 但是n是bsv自定义的temp不是数值 运算需要转换成数值
Bit#(n+1)是错的 应该写成Bit#(TAdd(n,1))
i<n是错的 应该写成i<value0f(n)
时序电路#
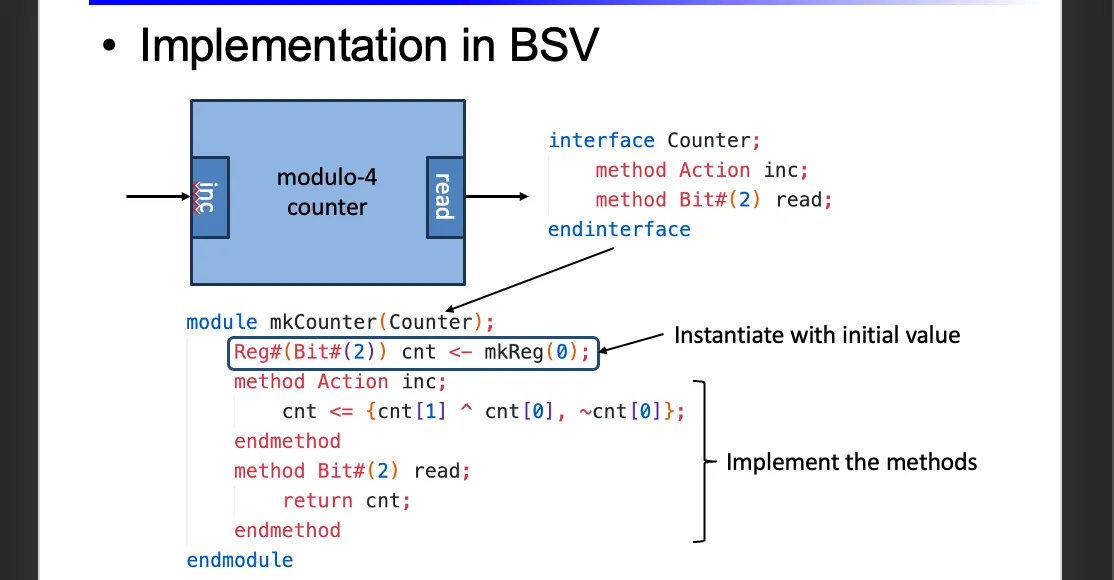
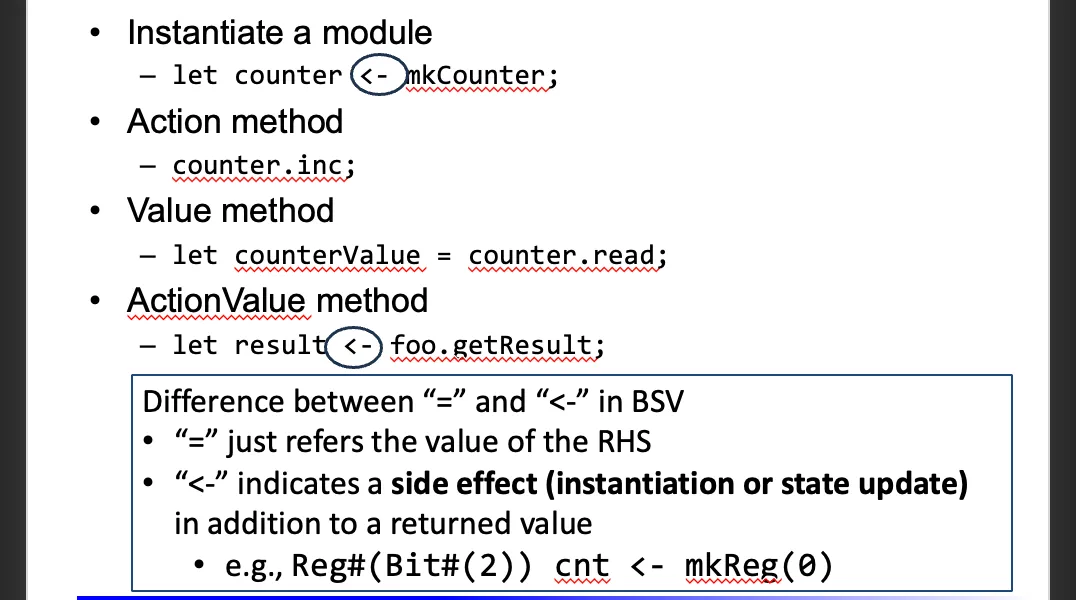
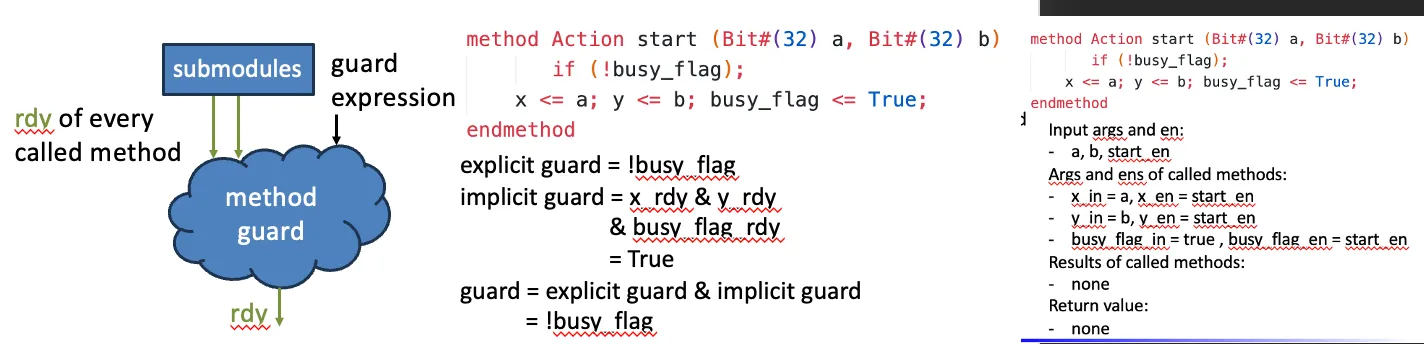
1.写一个module 内部有状态和接口 内部状态被读取或者必须通过接口的方法
1.1 动作方法:更新状态 method Action methodName (…);
1.2 值方法:只读状态/值 method ReturnType methodName ();
1.3 动作值方法:更新状态并且读出状态/值 method ActionValue#(ReturnType) methodName (…);
method <ReturnType> <methodName> ( <args> ) if ( <guard> );
    <body>
endmethod

//action method
		method Action inc;
        cnt <= {cnt[1] ^ cnt[0], ~cnt[0]};
    endmethod
//value method
		method Bit#(2) read;
        return cnt;
    endmethod
 //action valeumethod
	  method ActionValue#(Bit#(32)) getResult if (busy_flag && (x == 0));
        busy_flag <= False;
        return y;
endmethod2.具体FSM的实现
3.方法调用的符号
Rule &Guard#
A rule is similar to always@(…) in Verilog, but has execution conditions 每周期检查触发条件
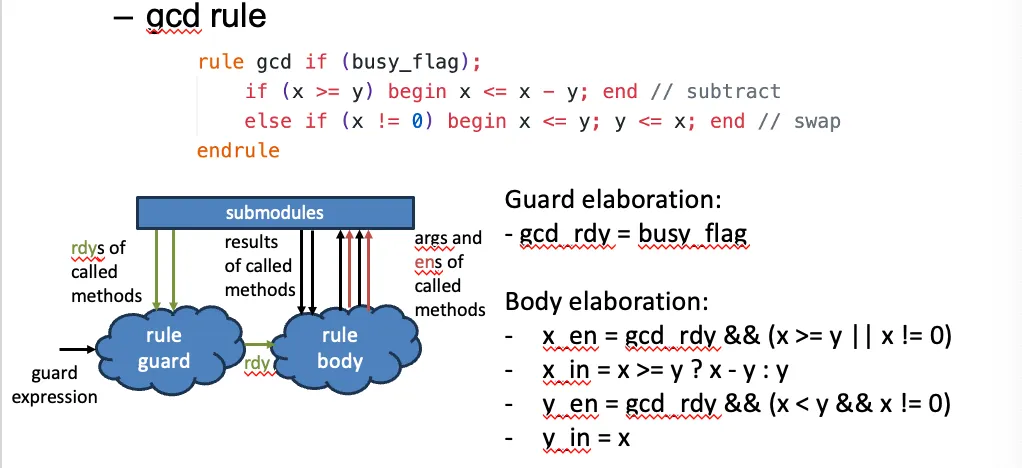
	rule gcd;
		if (x >= y) begin x < x - y; end
		else if (x != 0) begin x <= y; y <= x; end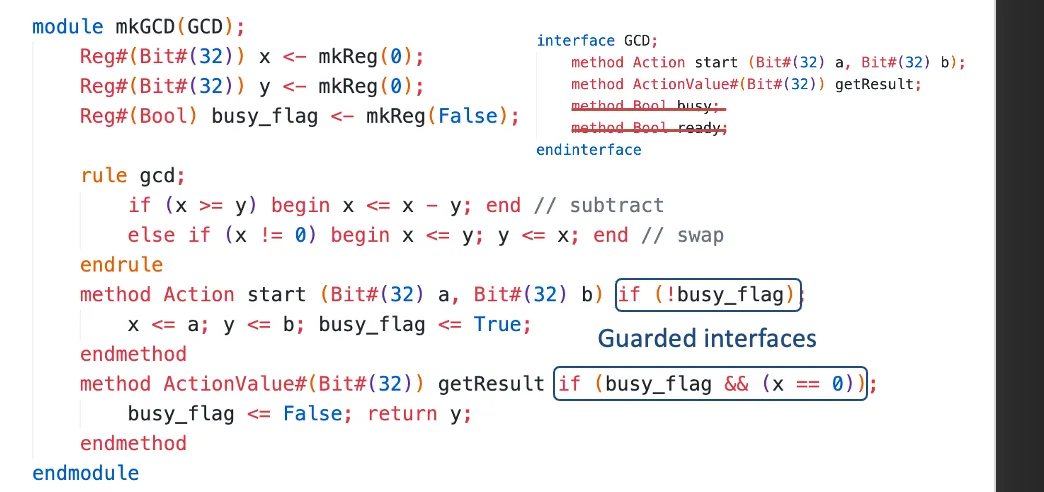
endrule1.示例:辗转相除法的module
interface GCD;
method Action start (Bit#(32) a, Bit#(32) b);
method Bit#(32) getResult;
//method Bool busy; //如果后面if guard了则不用
//method Bool ready;//如果后面if guard了则不用
endinterface

module mkGCd (GCD) ;
	Reg#(Bit#(32)) X <- mkReg (0);
	Reg#(Bit#(32)) y <- mkReg(0);
	Reg#(Bool) busy_flag <- mkReg (False);

	rule gcd;
		if (x >= y) begin x < x - y; end
		else if (x != 0) begin x <= y; y <= x; end
	endrule

	method Action start (Bit#(32) a, Bit#(32) b) if (!busy_flag);
		x <= a; y <= b; busy_flag <= True;
	endmethod
	method ActionValue#(Bit#(32)) getResult if (busy_flag&&(x==0));
		busy_flag <= False; return y;
	endmethod
	//method Bool busy = busy_flag;//如果前面if guard了则不用
	//method Bool ready = (x == 0);//如果前面if guard了则不用
endmodulemethod有guard
rule也可以有guard

串行执行#
rule method内部是原子化的
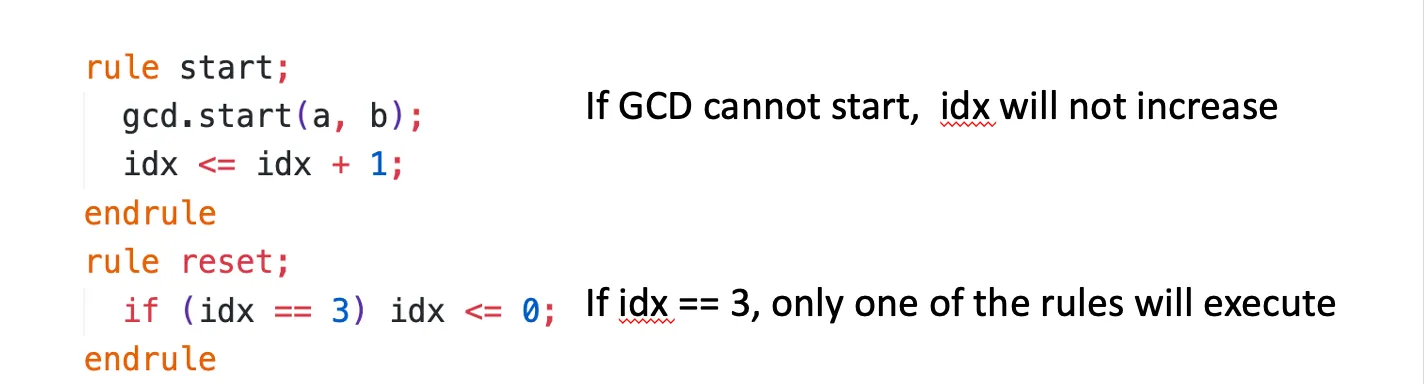
两个rule如果读写冲突,先判断是否可以一起执行,如果可以先执行谁(先读后写)
如何判断冲突:冲突矩阵conflict matrix
冲突规则定义
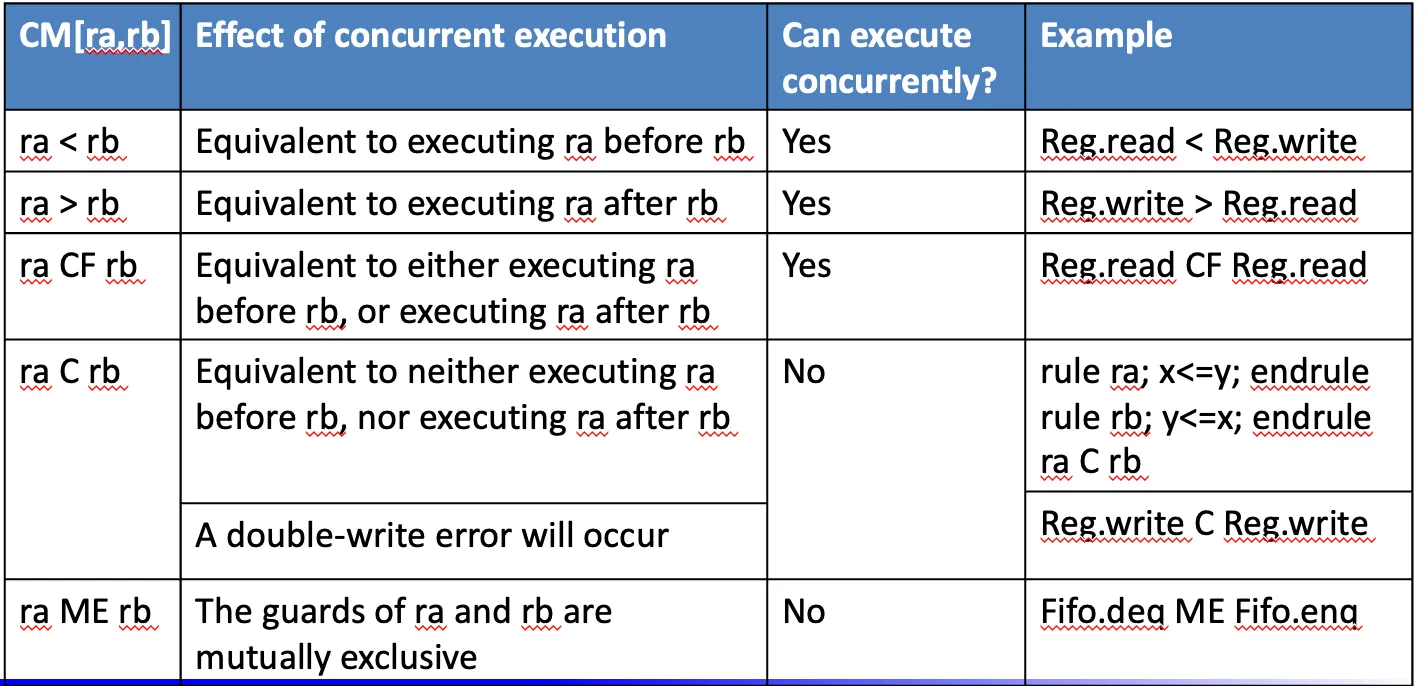
冲突矩阵CM的建立
- mcalls(gcd) = {x.write, x.read, y.write, y.read}
2.conflict(x,write, x,read) = {>} conflict(x,write, x,write) = {C} conflict(x,write, y,write) = {CF}
conflict(xx,xx)=: CF = {<,>} < = {<} >= {>} C = {} ME = {}
3.mcalls(ra) = {x.w, x.r} mcalls(rb) = {y.w, y.r} CM(ra, rb)= conflict(x.w, y.w) ∩ conflict(x.w, y.r)∩ conflict(x.r, y.w) ∩ conflict(x.r, y.r)
硬件综合#
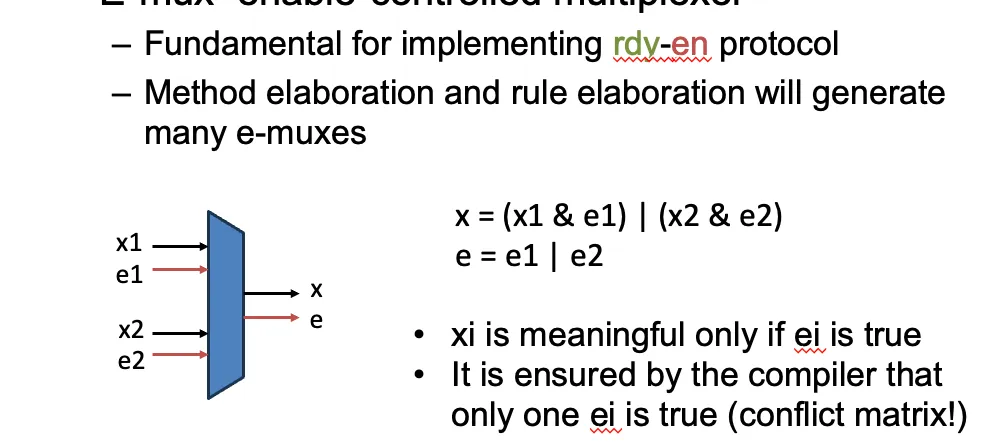
1.IO wire: rdy-en
2.Primitive (原语) modules:reg FIFO BRAM内置好的
3.示例化
Method elaboration:
1.guard elaboration
rule elaboration
2.EMUX
Rule Elaboration
Rule Scheduler for conflication
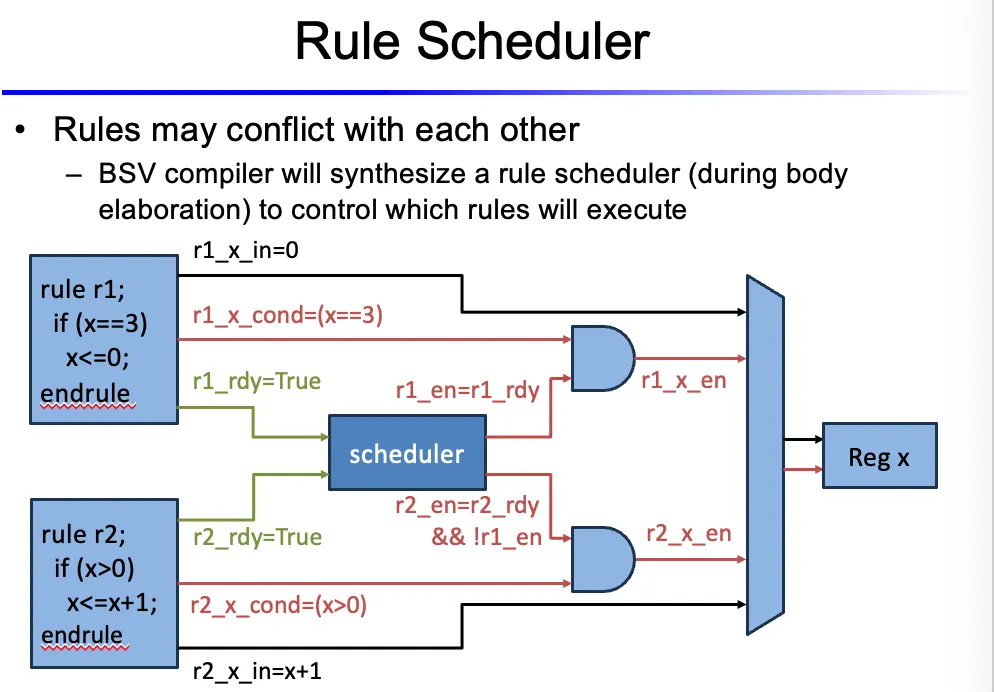
怎么基于冲突矩阵建立rule scheduler
先建立一个priority
